
在本教程中,我们将构建一个 Web 应用程序,该应用程序使用 Stable Diffusion(一种深度学习文本到图像模型)根据文本提示生成图像。我们将在前端/后端使用 Next.js 并将应用程序部署在 Vercel 上。

目录
简介先决条件设置 Next.js 项目安装 Tailwind CSS创建图像生成表单创建用于稳定扩散的 API 路由在 Vercel 上部署应用程序结论
介绍
Stable Diffusion 是一个强大的文本到图像模型,可以根据文本描述生成非常详细的图像。在本教程中,我们将构建一个 Web 应用程序,允许用户输入文本提示并使用 Stable Diffusion 根据该提示生成图像。
此 Web 应用程序可以作为进一步试验和开发基于各种稳定扩散模型的创意工具的良好起点。
先决条件
在我们开始之前,请确保您的计算机上安装了以下内容:
节点.jsnpm
此外,如果您还没有一个 Vercel 帐户,您应该注册一个。
设置 Next.js 项目
首先,让我们使用 TypeScript 和 ESLint 创建一个新的 Next.js 项目。
npx create-next-app@latest my-project --typescript --eslintcd my-project此命令将在名为my-project.
安装顺风 CSS
现在,我们将安装 Tailwind CSS 来设计我们的应用程序。按着这些次序:
安装 Tailwind CSS 及其对等依赖项:
npm install -D tailwindcss postcss autoprefixernpx tailwindcss init -p在以下位置配置您的模板路径tailwind.config.js:
/** @type {import('tailwindcss').Config} */module.exports = { content: [ "./pages/**/*.{js,ts,jsx,tsx}", "./components/**/*.{js,ts,jsx,tsx}", ], theme: { extend: {}, }, plugins: [],};将 Tailwind 指令添加到您的globals.css文件中:
@tailwind base;@tailwind components;@tailwind utilities;运行开发服务器:
npm run dev您的 Next.js 项目现在已使用 Tailwind CSS 进行设置。
创建图像生成表单
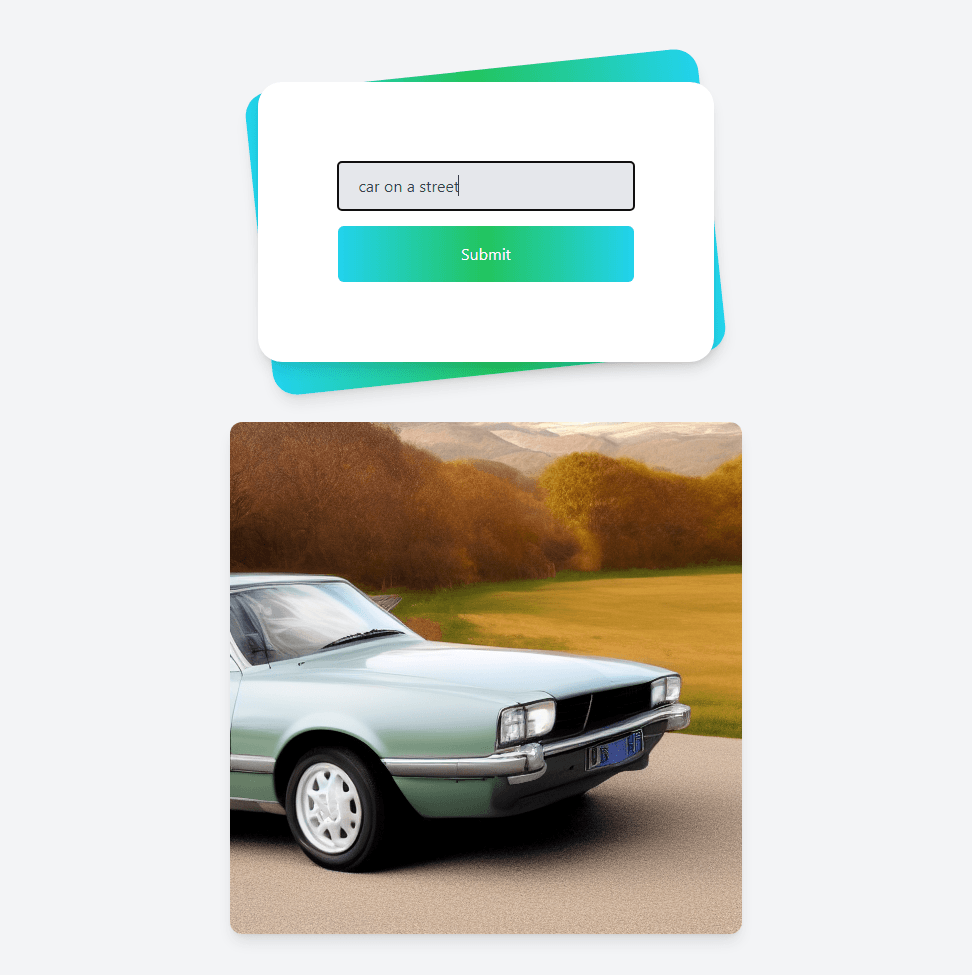
接下来,让我们创建一个表单供用户输入他们的文本提示。pages/index.tsx使用以下代码更新您的文件:
import { useState } from 'react';function Home() { const [inputValue, setInputValue] = useState(''); const [imageUrl, setImageUrl] = useState(''); const [loading, setLoading] = useState(false); const handleSubmit = async (event) => { event.preventDefault(); setLoading(true); const response = await fetch('/api/stablediffusion', { method: 'POST', headers: { 'Content-Type': 'application/json', }, body: JSON.stringify({ value: inputValue }), }); if (response.ok) { const data = await response.json(); setImageUrl(data[0]); } else { console.error('Error:', response.statusText); } setLoading(false); }; return ( <div className="min-h-screen bg-gray-100 py-6 flex flex-col justify-center sm:py-12"> <div className="relative py-3 sm:max-w-xl sm:mx-auto"> <div className="absolute inset-0 bg-gradient-to-r from-cyan-400 via-green-500 to-cyan-400 shadow-lg transform -skew-y-6 sm:skew-y-0 sm:-rotate-6 sm:rounded-3xl"></div> <div className="relative px-4 py-10 bg-white shadow-lg sm:rounded-3xl sm:p-20"> <form onSubmit={handleSubmit} className="max-w-md mx-auto space-y-4"> <input type="text" value={inputValue} onChange={(e) => setInputValue(e.target.value)} className="w-full px-5 py-3 text-gray-700 bg-gray-200 rounded" placeholder="Enter a prompt..." /> <button type="submit" className="w-full px-3 py-4 text-white bg-gradient-to-r from-cyan-400 via-green-500 to-cyan-400 rounded-md focus:outline-none" disabled={loading}> Submit </button> </form> </div> </div> {loading && ( <div className="mt-12 flex justify-center"> <div className="loader ease-linear rounded-full border-4 border-t-4 border-gray-200 h-12 w-12"></div> </div> )} {imageUrl && !loading && ( <div className="mt-12 flex justify-center"> <img src={imageUrl} alt="Generated image" className="rounded-xl shadow-lg" /> </div> )} <style jsx>{` .loader { animation: spin 1s linear infinite; border-top-color: #3498db; } @keyframes spin { 0% { transform: rotate(0deg); } 100% { transform: rotate(360deg); } } `}</style> </div> );}export default Home;此代码创建一个表单,用户可以在其中输入文本提示并提交以生成图像。它还会在生成图像时显示加载微调器。
为稳定扩散创建 API 路由
现在,我们将创建一个 API 路由来处理稳定扩散图像生成。创建一个名为的新文件pages/api/stablediffusion.ts并添加以下代码:
import Replicate from 'replicate';const handler = async (req, res) => { if (req.method !== 'POST') { res.status(405).json({ message: 'Method not allowed' }); return; } const { value } = req.body; try { const replicate = new Replicate({ auth: process.env.REPLICATE_API_TOKEN, }); const output = await replicate.run( "stability-ai/stable-diffusion:db21e45d3f7023abc2a46ee38a23973f6dce16bb082a930b0c49861f96d1e5bf", { input: { prompt: value, image_dimensions: "512x512", num_inference_steps: 12, num_outputs: 1, guideance_scale: 3.5, scheduler: "K_EULER", }, }, ); res.status(200).json(output); } catch (error) { console.error(error); res.status(500).json({ message: 'Internal server error' }); }};export default handler;确保将您的 Replicate API 令牌添加到一个.env文件中:
REPLICATE_API_TOKEN=your_replicate_api_token_here此 API 路由将处理来自前端的请求,以使用稳定扩散模型生成图像。
在 Vercel 上部署应用程序
要在 Vercel 上部署应用程序,请执行以下步骤:
安装 Vercel CLI:
npm i -g vercel通过 CLI 登录到您的 Vercel 帐户:
vercel loginvercel在项目目录中运行命令以部署应用程序:
vercel按照提示将您的项目链接到现有的 Vercel 项目或创建一个新项目。您的应用程序将部署在一个唯一的 URL 上,您将能够在 Web 浏览器中访问它。
您可以在 GitHub 上找到本教程的完整代码。
结论
在本教程中,我们构建了一个 Web 应用程序,该应用程序使用 Stable Diffusion 基于文本提示生成图像。我们将 Next.js 用于前端,将 Tailwind CSS 用于样式,并将我们的应用程序部署在 Vercel 上。您现在可以使用此应用程序根据文本描述生成图像并探索稳定扩散模型的功能。
如果您想测试您在本教程中学到的技能,我们想邀请您加入我们特别的 Stable Diffusion AI 黑客马拉松!在为期 7 天的活动中,您将有独特的机会与来自世界各地的其他志同道合的人一起使用 Vercel 和 Stable Diffusion 创建应用程序的工作原型!
查看我们的 AI 应用程序页面,了解更多由我们的社区成员使用 Stable Diffusion、ChatGPT 和更多基于 AI 的尖端技术创建的 AI 应用程序项目!也许您会受到启发,或者您会找到一个很酷的解决方案并希望加以改进?那么请不要犹豫,联系团队并与他们分享您的意见,并可能加入他们构建基于 AI 的应用程序的旅程!
我们很乐意邀请您加入创造者、建设者和创新者的社区,用 AI 的力量塑造未来!