
什么是 InPainting?
图像修复是 AI 研究的一个活跃领域,AI 已经能够提出比大多数艺术家更好的修复结果。这是一种生成图像的方法,其中缺失的部分已经用视觉和语义上合理的内容填充。它对于许多应用程序非常有用,例如广告、改进您未来的 Instagram 帖子、编辑和修复您的 AI 生成的图像,甚至可以用于修复旧照片。执行修复的方法有很多种,但最常见的方法是使用卷积神经网络 (CNN)。CNN 非常适合修复,因为它可以学习图像的特征并可以使用这些特征填充缺失的内容,并且有许多不同的 CNN 架构可用于此目的。
稳定扩散简介
Stable Diffusion 是一种潜在的文本到图像扩散模型,能够生成风格化和逼真的图像。它在 LAION-5B 数据集的一个子集上进行了预训练,该模型可以在家用消费级显卡上运行,因此每个人都可以在几秒钟内创作出令人惊叹的艺术作品。
如何使用稳定扩散进行修复
本教程帮助您进行基于提示的修复,而无需绘制遮罩 – 使用 Stable Diffusion 和 Clipseg。在这种情况下,遮罩是一个二值图像,它告诉模型要修复图像的哪一部分以及要保留哪一部分。进一步的要求是您需要一个好的 GPU,但它在 Google Colab Tesla T4 上也能正常运行。
执行 InPainting 需要 3 个强制输入。
输入图像中要替换的部分的Input Image URLPromptOutput Prompt
您可以调整某些参数
Mask PrecisionStable扩散生成强度
如果您是第一次使用 Hugging Face 的 Stable Diffusion 🤗,您需要在模型页面上接受 ToS 并从您的用户个人资料中获取您的 Token
让我们开始吧!
安装用于对大文件进行版本控制的开源 Git 扩展
! git lfs install克隆 clipseg 存储库
! git clone https://github.com/timojl/clipseg 从 PyPi 安装扩散器包
! pip install diffusers -q安装更多的助手
! pip install transformers -q -UU ftfy gradio 使用 pip 安装 CLIP
! pip install git+https://github.com/openai/CLIP.git -q现在我们继续使用 Hugging Face 登录。为此,只需运行以下命令:
from huggingface_hub import notebook_loginnotebook_login()登录过程完成后,您将看到以下输出:
Login successfulYour token has been saved to /root/.huggingface/token%cd clipseg! lsdatasets metrics.py supplementary.pdfenvironment.yml models Tables.ipynbevaluation_utils.py overview.png training.pyexample_image.jpg Quickstart.ipynb Visual_Feature_Engineering.ipynbexperiments Readme.md weightsgeneral_utils.py score.pyLICENSE setup.pyimport torchimport requestsimport cv2 from models.clipseg import CLIPDensePredTfrom PIL import Imagefrom torchvision import transformsfrom matplotlib import pyplot as pltfrom io import BytesIOfrom torch import autocastimport requestsimport PILimport torchfrom diffusers import StableDiffusionInpaintPipeline as StableDiffusionInpaintPipeline加载模型
model = CLIPDensePredT(version='ViT-B/16', reduce_dim=64)model.eval();model.load_state_dict(torch.load('/content/clipseg/weights/rd64-uni.pth', map_location=torch.device('cuda')), strict=False);非严格的,因为我们只存储解码器权重(不是 CLIP 权重)
device = "cuda"pipe = StableDiffusionInpaintPipeline.from_pretrained( "CompVis/stable-diffusion-v1-4", revision="fp16", torch_dtype=torch.float16, use_auth_token=True).to(device)或者,您可以像这样从外部 URL 加载图像:
image_url = 'https://okmagazine.ge/wp-content/uploads/2021/04/00-promo-rob-pattison-1024x1024.jpg' input_image = Image.open(requests.get(image_url, stream=True).raw)transform = transforms.Compose([ transforms.ToTensor(), transforms.Normalize(mean=[0.485, 0.456, 0.406], std=[0.229, 0.224, 0.225]), transforms.Resize((512, 512)),])img = transform(input_image).unsqueeze(0)移回目录
%cd ..转换输入图像
input_image.convert("RGB").resize((512, 512)).save("init_image.png", "PNG")借助plt显示图像
from matplotlib import pyplot as pltplt.imshow(input_image, interpolation='nearest')plt.show()这将显示以下图像:

现在我们将为掩码定义一个提示,然后进行预测,然后将预测可视化:
prompts = ['shirt']with torch.no_grad(): preds = model(img.repeat(len(prompts),1,1,1), prompts)[0]_, ax = plt.subplots(1, 5, figsize=(15, 4))[a.axis('off') for a in ax.flatten()]ax[0].imshow(input_image)[ax[i+1].imshow(torch.sigmoid(preds[i][0])) for i in range(len(prompts))];[ax[i+1].text(0, -15, prompts[i]) for i in range(len(prompts))];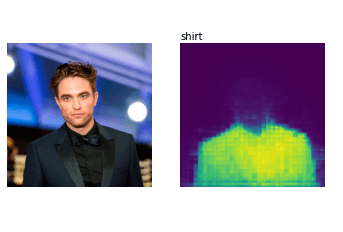
现在我们必须将这个蒙版转换成二进制图像并将其保存为 PNG 文件:
filename = f"mask.png"plt.imsave(filename,torch.sigmoid(preds[0][0]))img2 = cv2.imread(filename)gray_image = cv2.cvtColor(img2, cv2.COLOR_BGR2GRAY)(thresh, bw_image) = cv2.threshold(gray_image, 100, 255, cv2.THRESH_BINARY)# For debugging only:cv2.imwrite(filename,bw_image)# fix color formatcv2.cvtColor(bw_image, cv2.COLOR_BGR2RGB)Image.fromarray(bw_image)现在我们有一个看起来像这样的面具:

现在加载输入图像和创建的蒙版
init_image = Image.open('init_image.png')mask = Image.open('mask.png')最后一步:使用您选择的提示修复。根据您的硬件,这将需要几秒钟。
with autocast("cuda"): images = pipe(prompt="a yellow flowered holiday shirt", init_image=init_image, mask_image=mask, strength=0.8)["sample"]在 Google Colab 上,您只需输入图像名称即可打印出图像:
images[0]现在您会看到我们为其创建面具的衬衫已被我们的新提示所取代!🎉

请继续关注AIHubPro未来百科的教程!
谢谢你!– AI未来百科 ; 探索AI的边界与未来! 懂您的AI未来站