
完成本教程后,您将能够使用 EasyOCR 从照片中提取文本,并从 OpenAI 中使用 GPT-3 来总结文本!
🚀 开始
📚 安装依赖项
我们将从下载必要的库开始:
pip install easyocr openai matplotlib python-dotenv🤖 编码
对于本教程,我将使用 VSC,但您可以使用任何您想要的环境,包括笔记本或 Google Colab。
注意:我将在本教程中使用单个文件,但可以随意将代码拆分为模块。
🧰 导入依赖
import osimport cv2import openaiimport easyocrimport matplotlib.pyplot as pltfrom torch.cuda import is_availablefrom dotenv import load_dotenv📜 从图像中提取文本
对于此任务,我们将使用 EasyOCR。我们将创建一个能够为我们提取文本的类!
class Reader: def __init__(self, is_cuda=False): self.reader = easyocr.Reader(['en'], gpu=is_cuda, model_storage_directory=os.path.join('models'), download_enabled=True) def __call__(self, img): return self.extract_text(img) def extract_text(self, img, show_text=False, show_confidence=False): result = self.reader.readtext(img) extracted_text = [] for text in filter(lambda x: x[-1] > .45, result): box, acc_text, confidence = text # box[0] and box[2] - upper left and lower right corners of the box img = cv2.rectangle(img, [int(i) for i in box[0]], [int(i) for i in box[2]], (0, 255, 0), 2) # each coordinate is a list has to be int if show_text and show_confidence: img_text = f'{acc_text} - ({"{:.3f}".format(confidence)}%)' elif show_text: img_text = acc_text elif show_confidence: img_text = f'CONF: ({"{:.3f}".format(confidence)}%)' if show_text or show_confidence: img = cv2.putText( img, img_text, (int(box[0][0]), int(box[0][1] - 3)), cv2.FONT_HERSHEY_SIMPLEX, fontScale=.5, color=(168, 90, 50), thickness=2 ) extracted_text.append(acc_text) return extracted_text, img在__init__方法中,我们定义了英语阅读器,如果可用,它将使用 GPU,./models如果还没有下载,它将下载模型到目录。
__call__extract_text方法允许我们像函数一样只使用类的实例直接调用方法,例如:
reader = Reader()result = reader(img) # executes `extract_text` method and returns result最后一个方法是extract_text方法。它以图像作为参数并返回提取的文本列表和带有边界框的图像。它过滤掉置信度低于 45% 的文本。方法返回元组:带有边界框的提取文本和图像的列表,如果我们需要它还可以显示每个边界框的文本和置信度。
现在我们可以尝试使用这个类从图像中提取文本。为了让生活更轻松,我将创建用于加载图像的函数:
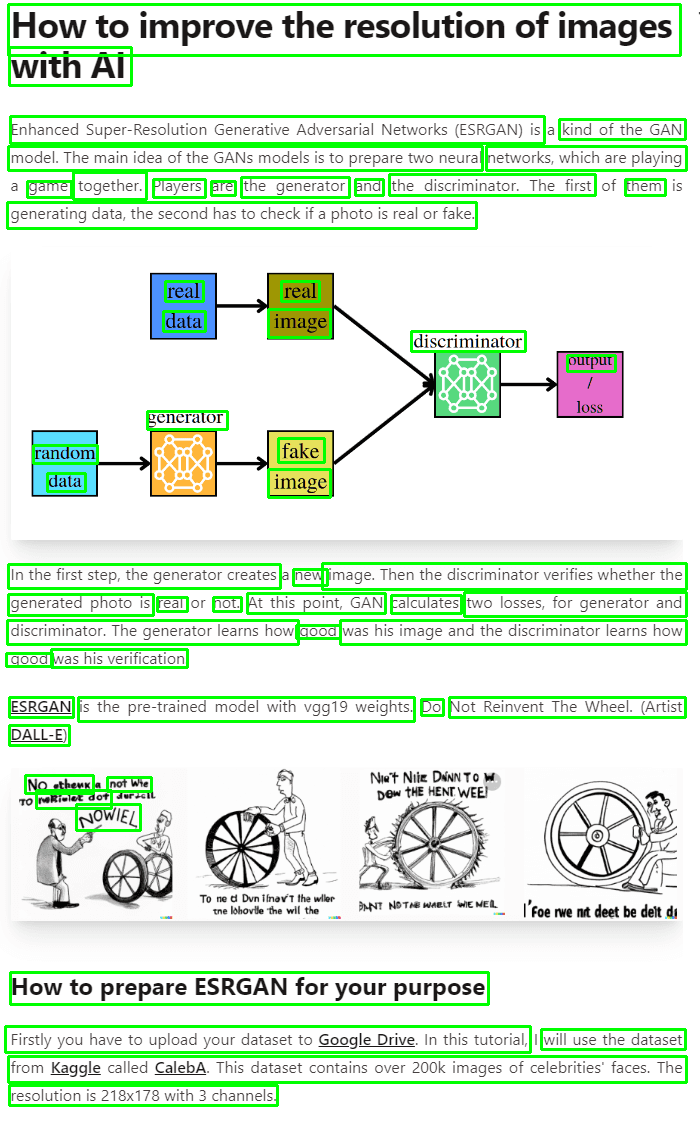
def read_img(img_path): img = cv2.imread(img_path) img = cv2.cvtColor(img, cv2.COLOR_BGR2RGB) return img我将使用 Adrian 之前教程中的图像:
if __name__ == '__main__': reader = Reader(is_cuda=is_available()) img = read_img('./example_post.png') text, extracted_image = reader(img) text = ' '.join(text) print('Extracted_text') print(text) plt.imshow(extracted_image) plt.show()结果:
带边界框的图像
提取的文本
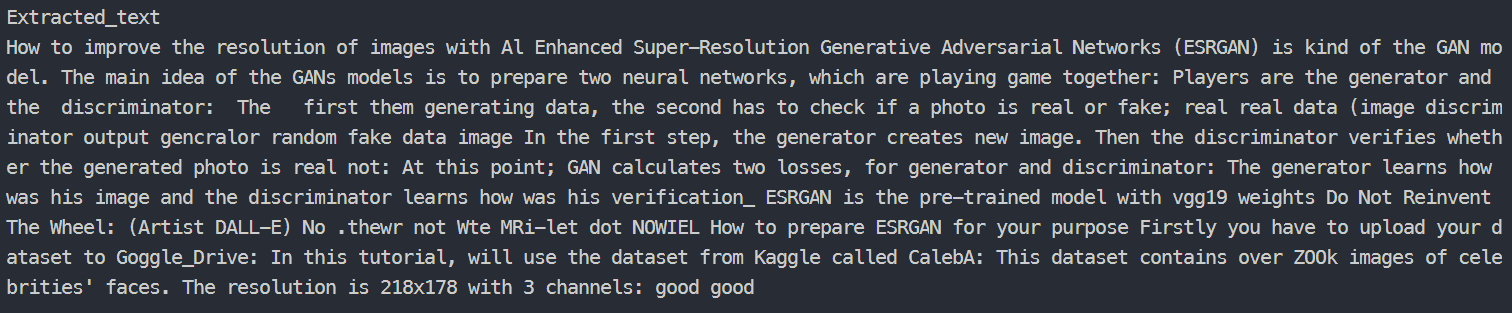
没有那么糟糕!
📝 文本摘要!
我们已经做得很好了!但这还没有结束。现在我们继续使用 GPT-3 进行文本摘要。
在这种情况下,我们还创建了一个类,它将处理我们对 GPT 的请求。
首先,我将创建.env文件并将我的 OpenAI API 密钥放在这里。
OPENAI_API_KEY=<your_api_key>现在我将为 GPT-3 定义类。
class GPT_3: def __init__(self, api_key): openai.api_key = api_key self.completion = openai.Completion self.options = { 'engine': 'text-davinci-002', 'temperature': 0.25, 'top_p': 1, 'frequency_penalty': 0, 'presence_penalty': 0, 'max_tokens': 512 } def __call__(self, prompt, options=None): return self.prediction(prompt, options) def prediction(self, prompt, options=None): if not options: options = self.options return self.completion.create(prompt=prompt, **options)['choices'][0]['text'] def summarize(self, text): prompt = f'Try to summarize the following text as best you can!\n\n{text}' return self.prediction(prompt=prompt)在__init__方法中,我们定义了 GPT-3 模型及其选项,并设置了 API 密钥。您可以在此处阅读有关这些 GPT-3 选项的信息。
__call__– 此方法与上一类具有相同的目的。
第三种方法 –prediction允许我们对给定的提示进行预测。
最后:summarize方法将总结给定的文本。
🧪测试一下!
完成工作后,我们的代码如下所示:
import osimport cv2import openaiimport easyocrimport matplotlib.pyplot as pltfrom torch.cuda import is_availablefrom dotenv import load_dotenvclass Reader: def __init__(self, is_cuda=False): self.reader = easyocr.Reader(['en'], gpu=is_cuda, model_storage_directory=os.path.join('models'), download_enabled=True) def __call__(self, img): return self.extract_text(img) def extract_text(self, img, show_text=False, show_confidence=False): result = self.reader.readtext(img) extracted_text = [] for text in filter(lambda x: x[-1] > .45, result): box, acc_text, confidence = text # box[0] and box[2] - upper left and lower right corners of the box img = cv2.rectangle(img, [int(i) for i in box[0]], [int(i) for i in box[2]], (0, 255, 0), 2) # each coordinate is a list has to be int if show_text and show_confidence: img_text = f'{acc_text} - ({"{:.3f}".format(confidence)}%)' elif show_text: img_text = acc_text elif show_confidence: img_text = f'CONF: ({"{:.3f}".format(confidence)}%)' if show_text or show_confidence: img = cv2.putText( img, img_text, (int(box[0][0]), int(box[0][1] - 3)), cv2.FONT_HERSHEY_SIMPLEX, fontScale=.5, color=(168, 90, 50), thickness=2 ) extracted_text.append(acc_text) return extracted_text, imgclass GPT_3: def __init__(self, api_key): openai.api_key = api_key self.completion = openai.Completion self.options = { 'engine': 'text-davinci-002', 'temperature': 0.25, 'top_p': 1, 'frequency_penalty': 0, 'presence_penalty': 0, 'max_tokens': 512 } def __call__(self, prompt, options=None): return self.prediction(prompt, options) def prediction(self, prompt, options=None): if not options: options = self.options return self.completion.create(prompt=prompt, **options)['choices'][0]['text'] def summarize(self, text): prompt = f'Try to summarize the following text as best you can!\n\n{text}' return self.prediction(prompt=prompt)def read_img(img_path): img = cv2.imread(img_path) img = cv2.cvtColor(img, cv2.COLOR_BGR2RGB) return imgif __name__ == '__main__': load_dotenv() # Load secrets reader = Reader(is_cuda=is_available()) gpt_3 = GPT_3(os.getenv('OPENAI_API_KEY')) img = read_img('./example_post.png') text, extracted_image = reader(img) text = ' '.join(text) print('Extracted_text') print(text) summarization_result = gpt_3.summarize(text) print('Summarized text:') print(summarization_result) plt.imshow(extracted_image) plt.show()我将再次运行代码,看看会发生什么。
带边界框的图像

提取的文本和摘要结果
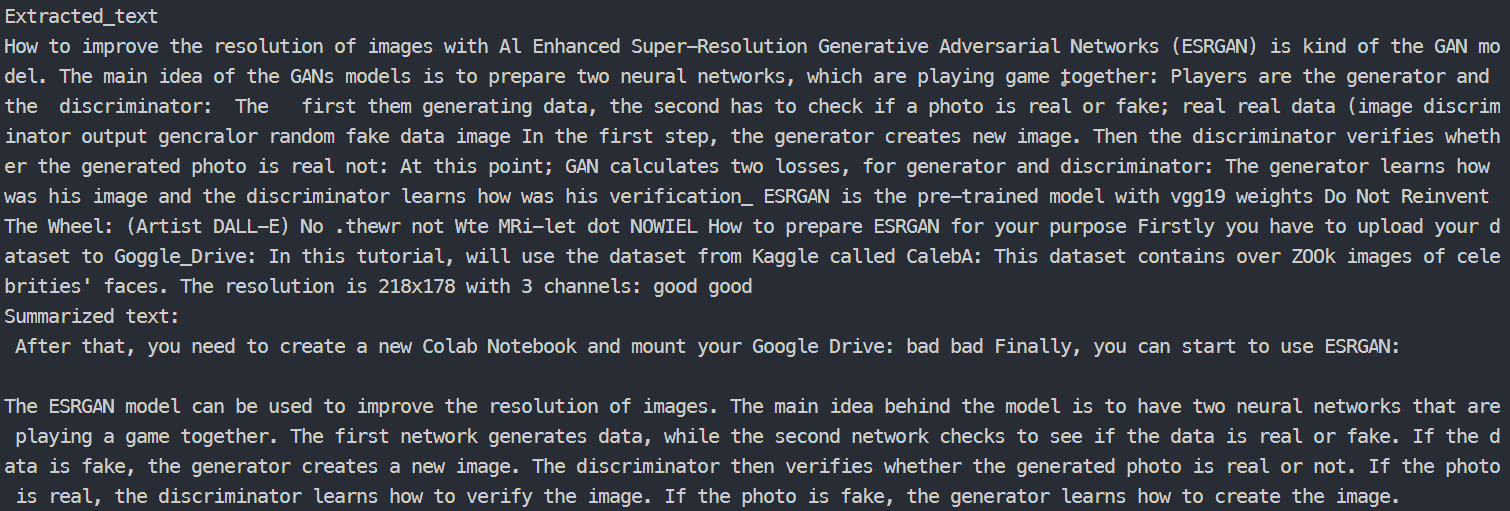
哇!看这个!我们真的能够创建简单的应用程序,能够从普通照片中总结我们的文本。希望你能用好它。
➡️ 在这里,我给你留下了整个存储库的链接。玩得开心!
请继续关注AIHubPro未来百科的教程!
谢谢你!– AI未来百科 ; 探索AI的边界与未来! 懂您的AI未来站